Sunday 12 May 2024

Gaslands - Part 4

Picking up where we left off, here are some more terrain tiles.  As the sand tiles represent rough terrain, these rocky tiles represent treacherous terrain.  These were made using the same methods as the sand tiles, but using a coarser grain of model railroad ballast.

Driving over a rockpile like this would be a little tough on most cars.

I put a couple of the billboards on rocky terrain.

One step that I still have to do is to spray the gravel with a mixture of white glue, water, and a bit of dish detergent to make sure that it's firmly attached to the base.


Wreck tiles.  These are simply sand tiles with the addition of some beat-up cars.

This one included a 3D printed concrete barrier that I tore apart with a pair of pliers.

The cars are a cheap no-name brand and are very brittle.  They're easy to twist and break with a pair of pliers.

And by very brittle, I mean extremely brittle.  It's easy to go too far.

This car clearly had a collision with something.

This car had the misfortune to hit some debris that had a fridge balanced on top.

Neither vehicle was able to drive away from this collision.

Whatever this car hit took away its front tires.

How fast was this guy going in reverse to do this kind of damage?

It looks like this car had a rollover.


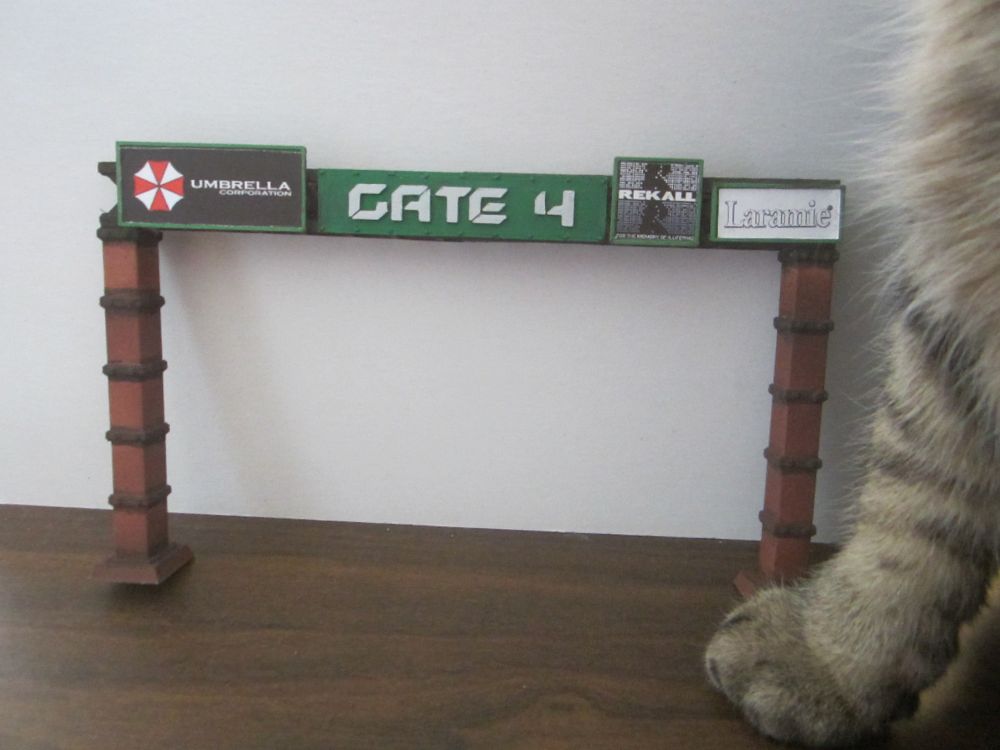
Gates are another terrain feature for the game.  I designed and 3D printed these.

They were a wee bit fiddly to glue together.

  With a coat of primer.

 And a bit of paint.

Here are the gates with the ads glued on.  I still need to finish painting the concrete pillars.


Silk decided to supurrvise the photographing process.
A fallen gate with one of the ad signs turned into a ramp.
 
 
The other half of the fallen gate.
 
 
Can you guess the source of all of the ads? 


Friday 10 May 2024

Gaslands - Part 3

Terrain. One of my favourite things to build. It probably goes back to my model railroad days. 

Since Gaslands is supposed to be a televised racing event, there will of course be some advertising.

And by some, I mean a lot.

As I'm a big fan of Futurama, I had to have an ad for Slurm.

The backside, all rusted up.

This started out as a basic 3D printed billboard, glued onto a scrap sheet of plastic.

Gluing these things together was a bit fiddly.  These cheap clamps from the Dollar store are great.

Mars.  Book your flight now.

This one developed a distinct lean when I glued it together.  Oh well, fits the ramshackle aesthetic.

Two of my favourite movies represented here.

Some billboards on top of concrete barriers and a few wreck terrain pieces.  More on those later.

Primed up.

Splashed on a black wash over random parts.

Finished with the Typhus Corrosion/Ryza Rust combo and glued on some ads printed out on paper.

A shot showing the black wash stage.

Having trouble keeping something glued?  Liberally apply some super glue and sprinkle on some baking powder.  It sets right up and can be sanded, although in this case I just left it as mounds of dirt around the poles.

The Zorg Industries billboard is pretty ruggedly built.

It's got electrolytes!

A couple of the sponsors.

And of course, a Fallout ad.

And some more sponsors.

Some crash barriers.  I made them small so that if a car crashes through, I only have to remove a small section.

I made a little jig to help with gluing.

Insert the legs and add a bit of superglue.

Apply the barrier bit and let dry.

Presto.

A truck full of yahoos and some barriers.

Painted up and some fine-grit model railroad ballast added.

Which brings me to the process of making sand markers.  In the game, these act as rough terrain.  First I start with a piece of 1mm thick plastic.

Add some spackle.

And let it dry (usually overnight).

Some cheap craft paint.

 
Some fine-grit model railroad ballast, white glue, a paintbrush, and a sheet of paper.

Brush on the glue.

Give it a good coat and put it in the middle of the sheet of paper.

Pile on the ballast and let it sit for a spell.

Tap the excess sand off and use the paper to pour it back into the bag.

And tada.  One sand marker.

I chose this colour of sand as it was a pretty good match with the vinyl mat that I use for a play surface.

Some sand markers.  One even has some sand dune action going.

Close-up.


Next, moar terrain.