Necromunda. This was a game put out by Games Workshop in the mid-90's
where two players could pit their gangs against each other in battle.
The base game featured some plastic miniatures and 3D terrain made from
plastic bulkheads and cardstock floors.
Unlike other GW games like Warhammer and Warhammer 40000, this game had some
continuity to it from one game to the next. Your gang members could gain
experience and new skills and could also get wounded or die. This
greatly appealed to me as I was into role-playing games long before I got into
miniature battle games.
I was living in Ottawa at the time and there was a group of us that got
together fairly regularly to play. Of course, one of the first things
that we did was to kitbash and scratch-build our own terrain to add to the
basic stuff that came with the box set. Heavy cardstock was cut up to
make new floors and walkways, and Pringles tubes became silos or support
pillars.
Eventually our interest in the game waned and it became an occasional thing
instead of a regular game night. These pictures are from a few sessions
in my apartment in Ottawa in 2013 and in Toronto in 2016. I had acquired
a big honkin' folding conference table that measured 42" wide and 12'
long. One half was set up as the terrain for the game and the other half
held the various rulebooks, our gang sheets, and dice and counters.

Of course, Lego as an ever-present accessory.
The view from the other end of the table, with Velvet chilling.
Here we have Silk making his way through the underhive. Velvet has the
ability to carefully walk though without disturbing anything. Silk, on the
other hand, clomps through like a bull in a china shop.
Even some Dark Future road tiles would occasionally make it onto the board.
Our tables were usually fairly dense with terrain. It made for some long
games as gang members would carefully maneuver their way into position.
There was usually a fair amount of scatter terrain to block line-of-sight and
provide cover.
Velvet decided to be a roadblock.
An Orlock gang member comes face-to-face with Silk the Destroyer.
Some Cawdor gangers take cover.
A big part of the game is checking to see if your model has line-of-sight to an
enemy model.
Counters are used to indicate certain conditions that affect models. This
Escher ganger is on Overwatch, meaning that she can interrupt the opposing
player's turn and take a shot at any enemy gang members that reveal themselves
to her.
Velvet is comfortably ensconced.
This hapless ganger's gun has jammed and an enemy ganger armed with a power
axe has just popped up through a hatch. Trouble's a-brewin'.
"If I fits, I sits."
In 2013 I backed a Kickstarter for a whole bunch of plastic terrain. It
was advertised as being modular and clicking together like Lego for endless
creativity.
While the terrain pieces looked good, they didn't go together like Lego.
The manufacturing tolerances just weren't up to snuff. Pieces were
either too loose and didn't stay together or too tight and wouldn't go
together. Between this and the fact that I never received some parts of
what was promised, I found the whole experience underwhelming.
That said, the pieces will be used, but in permanent structures. The
first up is a large factory.
It is a combination of the plastic pieces and 3D printed parts. Here is a
pic of the overall plan taken from Tinkercad.
3D printed pillar and support beam.
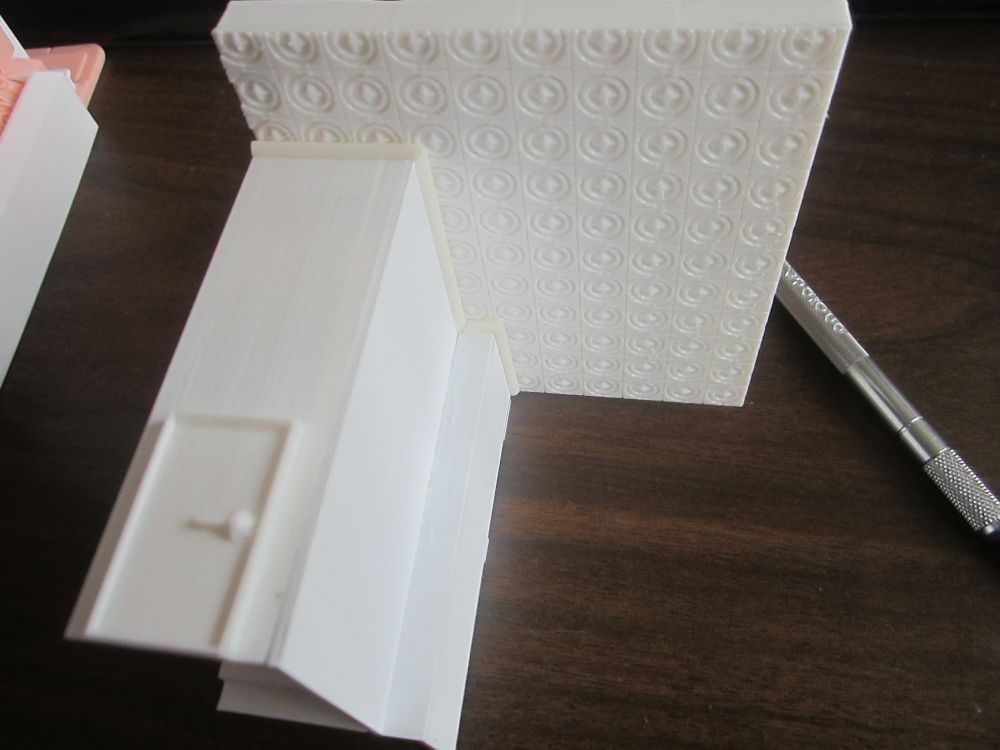
3D printed wall section and Lego door.
The inside of that wall section showing printed wall gubbins.
Silk inspects the stairway.
Some more planning pics. Tinkercad is great not only for designing pieces,
but for making 3D plans so you can visualize your build.
It took me a moment of looking at this trying to figure out why it looked weird
before I realized that the build is upside-down. Not sufficiently
caffeinated, I guess.
Some foundation walls.
Foundation in place.
This fire escape has seen better days.
Tedious process, adding bars to the railing.
The fire escape.
This is being made as a table-edge building, meaning that the open side is
butted up along the table edge.
The office section work in progress.
The main factory section.
From the inside.
The lobby has a tile floor.
Windows.
Big Lego door.
The printed pegs didn't have much strength and snapped off too easily. I'm
pretty sure I ended up switching to making holes and using plastic pegs.
A little bare. Need some furniture to provide cover.
A smokestack, made from pieces of a failed experiment. The four long
pieces were meant to be an extension for my vacuum cleaner so that I wouldn't
have to bend over so much to use it. However, they didn't hold together
nearly as well as I had hoped. The four short pieces were the original
test prints to test the fit with the vacuum hose.
Silk seems unimpressed.
Some furniture...
This project ended up getting sidelined, likely because I ran out of filament
to finish the job and by the time I had gotten more, I had moved on to other
things. Eventually I'll circle back around to it and get it
finished. But first I need to get some more filament...