Alrighty. Time to show off some completed builds and what little bit of
painting I've managed to get done. Here we have a Goff nob being driven
into battle with a handful of his gang.
Silk watches as I work on a trukk that has a looted Imperial cabin. I
had to cut the cabin in half and widen it a wee bit to fit the Orks.
Apparently the driver had the roof cut off so that he could let his topknot
fly free.
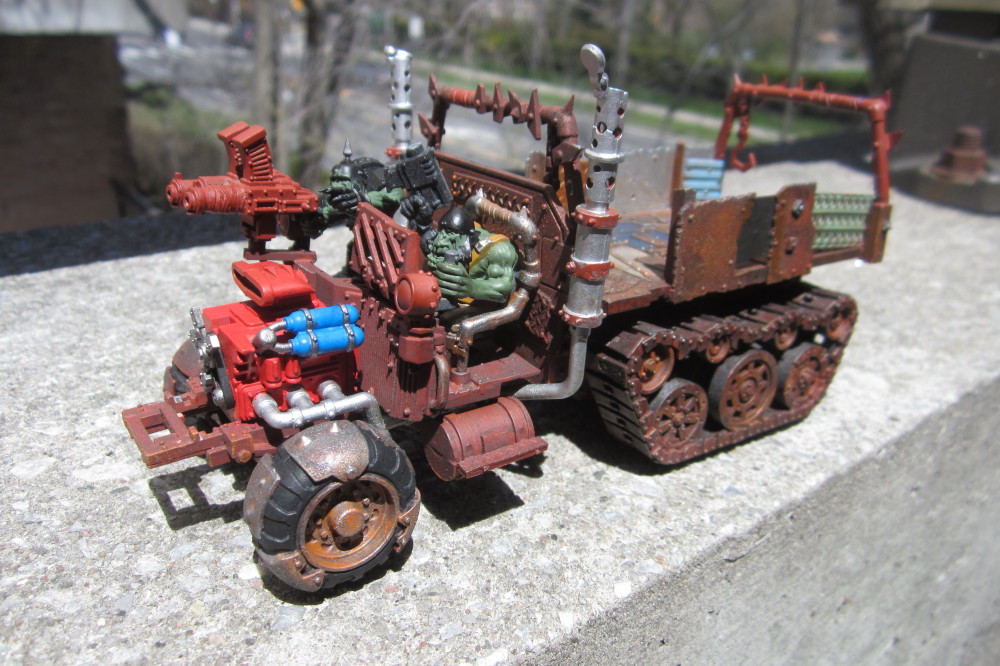
Another trukk. The gas tank is from the same kit as the above cabin,
a 1/35 Chinese Jiefang CA-30 military truck. The front fenders and
trakks are from the Ork battlewagon kit.
And of course, the bumper and glyph plate are magnetized.
The harpoon is an old GorkaMorka bit. I replaced the head with one from an
Orc boar boy.
Ready for priming.
Silk inspects the priming job.
It's the scoop that does it for me.
I think that the tracked version looks pretty good.
If I remember right, I used a piece of window screen for the grill. Which
reminds me, I have an entire roll of the stuff stashed away in a box
somewhere. I should see if I can find it as it would be useful for a
couple of my current projects.
A good view of the gunner. My thinking behind magnetizing his arm and
putting him on a base was so that in a game of GorkaMorka, if his big gun or the
trukk was disabled, he could go on foot and I could swap out his arm with one
armed with a pistol.
Slow start to the painting process.
Different trukk, same bed.
Magnetic glyph plate and a boarding plank.
Speaking of boarding planks, I should mention that I made them magnetic as
well. It takes a total of eight(!) magnets to mount one of these.
So... is the middle one a bumper like the one on the right, or a reinforced ram
like the one on the left?
I scratch-built a little shelf to hold some gas cans.
A shot of the trukk with the bed off.
I don't remember where these exhausts are from. The Deff Dread kit
maybe?
If I remember right, the headlights are from the Space Marine Rhino kit with a
bit of round tube added.
Here you can actually see the layering of sheets for the bed.
I used the underside of a bed to try out the Typhus Corrosion and Ryza Rust
combination.
It gives a pretty good look with minimal effort.
You can see where I gave it a pretty heavy coat of Typhus Corrosion.
After I painted some of the individual panels, I slapped on some more Typhus
Corrosion for good measure.
Some drybrushing and a few washes.
Top it off with a liberal dusting of weathering powders, and it's nice and
grungy.
Another bed. After painting and weathering, it's difficult to see where
the kit bed ends and the scratch-built stuff begins.
And another bed.
Silk watching over the painting process.
I like the different textures that you can get with Typhus Corrosion.
I also like how the one painted panel came out.
I like to experiment. I wanted to see if I could replicate this look.
At this stage it just looks weird, and I was thinking 'what the hell and I
doing?'
Some more work and it was starting to look better.
I initially painted the entire panel with either Lightning Bolt Blue or
Ultramarine Blue (I don't remember which) and then put on spots of
Electric Blue (I own some really old paints). Then in the center of each
of the light blue spots, I put on Typhus Corrosion and brushed on Ryza
Rust over that.
The rivets and streaks on the treadplate were done with the Macharius
Solar Orange (I think). Then I had at it with some washes. I think at
first I only used either the Brown or Armour washes (or both). But
eventually I ended up trying all the washes. My technique pretty much
consists of slapping random stuff on until I stumble across a look that I
like.
As for the end result, I think I overdid the washes on the blue part,
although it looks good and grimy now. I like how the long top panel came
out, and the right panel looks really corroded.
I wanted to try to replicate this look:
I don't remember the exact steps, but the white was a result of pooling
white paint thinned to a wash, letting it dry a little, then blotting up the
rest. The yellow was originally done the same way, but it didn't look
right, so I brushed on more.
It still wasn't right, so I washed over the whole thing with a variety of
washes (although I think Sepia was the one I used most).
I allowed it to mix and pool in some areas and blotted it up in others. I
like the end result, but I really have no idea how I got there.
This was another experiment. I painted this panel neutral grey, and
then some yellow. I really don't know what I did for the yellow to end up
looking like it did, but it was stupidly hot that day and it was drying pretty
quickly.
Anyway, then I added some really thinned white, which I allowed to pool, dry a
bit, then blotted up the rest. I didn't get the same neat effect as above (and
forgot to take a picture of that step), so I covered most of it up with Typhus
Corrosion.
I added a couple of dabs on the yellow and drybrushed on some Ryza Rust and
painted the skid plate.
I thought I'd try something different and painted on some Vallejo Crackle Medium
on the yellow paint. After some time it *looked* dry and hadn't cracked, so I
decided to give it a wash with some Seraphim Sepia. Apparently it wasn't
completely dry and turned into a gummy mess. But it looked interesting, so I
left it. The panel on the right was lightly brushed with Typhus Corrosion and
then I added several different washes, not even waiting for the first layer to
dry before adding a different colour.
After things dried, I added some orange wash to some rivets and drybrushed with
Pig Iron and dusted on some grey weathering chalk. As you can see, I
don't really have a plan or a consistent method. Usually I keep adding stuff
until I get to "meh, good enough", but sometimes I have a happy accident that
turns out rather cool.
Another example of Typhus Corrosion & Ryza Rust with some washes &
drybrushing.
It could be better, but it's reached the 'meh, good enough' stage.
Silk giving me the hairy eyeball because it's feeding time.
Starting to come together.
I'm painting these to be mostly neutral colours and to use the clan-specific
glyph plates to indicate ownership. The fluff reason is that on the world
that I'm working on to be the setting for my games of GorkaMorka and Necromunda
(and future stories), paint squigs are relatively rare. So most Ork
vehicles are either unpainted (and rusty) or only have the paint that was
originally on them (for looted bits). Only wealthy Orks can afford to
paint an entire vehicle.
Most Orks will spring for the cost to paint the engine red to make it 'go
fasta'. The bottles of explosive squig juice (for thrusters) are generally
painted blue. Nobody seems to know why.
I wanted to see what the painting that I'd done so far looked like under natural
light, so I took it out on the balcony for some pics.
All in all, I was fairly happy with the progress so far.
A good shot of my Deathskulls and the spear gun.
A shot of the trakk base. I used a portion of the side walls from the
battlewagon kit and just added a sheet of styrene to the top and some strips.
Deathskulls. I was trying out some clear bases. While I like the
look of them when on vehicles, they're a real pain to attach.
Wrecking ball.
Goffs.
Deathskulls. I'll eventually be putting up a post on how I made the dude
with the stop sign.
I like the Goff clan glyph plate.
Deathskulls.
The squig juice bottles also have a little 'Zag' lighting bolt glyph.
Oh, and I made the driver's head magnetic, so I can swap it out depending on
which clan the trukk belongs to.
And finally, I like this little detail of the closed clapper on the broken
stack.
And that wraps up my series on Ork trukks. At least until I build or
paint some more.
Cheers.